|
This section will guide you through the setup and configuration of PrintPower™. To receive the installation file, contact TCS Customer Support at (800) 963-9920 or visit the following link for written and video installation help and a link to download the file. https://printpower.s3.amazonaws.com/docs/index.html
Latest download PrintPower v1.11 |

Compatability
PrintPower™ is designed to work with the following operating systems... Windows7, Windows8, Windows10, Windows Server 2003, Windows Server 2008, Windows Server 2012, Windows Server 2016, Windows Server 2019.
Installation of PrintPower™
•Single Workstation: Once the file has been downloaded from TCS, navigate to the location of the installation file and simply double-click on the file, typically named something like 'PrintPower.exe'. Follow the on-screen instructions.
•Peer-to-peer Network: This install is the same as a single workstation. Each workstation will operate independently of each other.
•Small Network or Workgroup: This installation is the same as a single workstation. PrintPower™ must be installed separately on each workstation.
•Remote Desktop Users: For users using Remote Desktop (RPD) to connect and run Tire Power™, typically multi-site customers, the installation is a little different. You have the option to install the application on the server only. The connecting work stations will be able to select PrintPower™ from the list of available printers when using print preview. To install on the Server...
•Be sure you are logged into the server as the 'Administrator', not the 'Administrative Group', but the actual user called 'Administrator'.
•Navigate to the location of the installation file and simply double-click on the file, typically named something like 'PrintPower.exe'. Follow the on-screen instructions.
•TCS Hosted Customers: Customers using TCS Hosting will have this application available to them automatically. TCS will need to work with you to set some parameters and options.
|
To ensure you have PrintPower™ installed, you may look in your 'Devices and Printers' list on your computer to view the printer icon. |

Registration
|
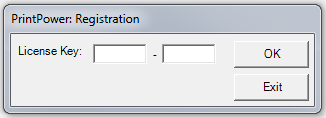
PrintPower™ is a registered product, so a valid License key is required. Only one key per Company is required. To obtain your license key, contact TCS Customer Support at (800) 963-9920. |
Setup and Features of PrintPower™
Status Tab
|
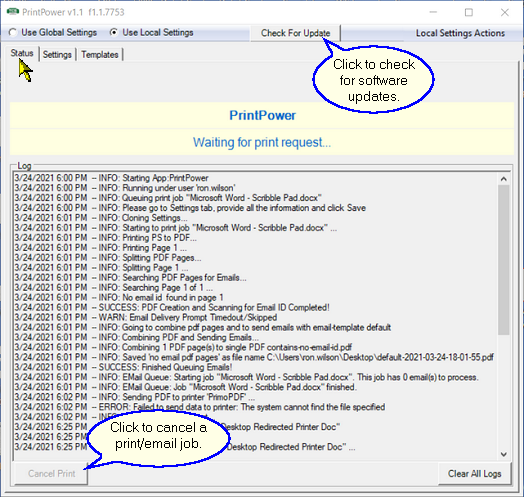
The 'Status' tab is where you may view the PrintPower™ activity log as well as cancel your email/print job if needed.
Buttons •'Check For Update': Click to check if you have the latest version of the software. •'Cancel Print': Cancel the current email/print job. •'Clear Logs': This clears the log data off the window. |
Settings Tab
|
The 'Settings' tab is where you can set and adjust the various settings for both 'Global' and 'Local' settings. You may also import and export these settings, or copy settings from 'Local' to 'Global', and vice versa. Top Window Frame (Settings Tab) Radio Buttons •'Use Global Settings': Select this to use global settings, which can be applied to all users of this computer. Typically, this would be used in a RDP connection installation, and to be able to change these settings, you would have to be an Administrator on the computer where the application is installed on. Most installations will be using the 'Local Settings' option. |

•'Use Local Settings': Select this to use settings specific to the computer you are using the application on. Typically, this is used in a LAN setup and for most situations.
Menu (top window frame)
'Global/Local Settings Actions': This button name is determined by the settings option you have selected and is used to import/export/copy your settings. Select this menu to:
▪Export Settings: For Admin User, export a copy of your settings to be used later, or be transferred to a computer for use by another User. Non-Admin may only export 'Local Settings'.
▪Import Settings: For Admin User, select this to import settings which have been exported from another instance of the application. Non-Admin may only import 'Local Settings'
▪Copy Settings: For Admin User, copy your settings from 'Global' to 'Local', or vice versa. Non-Admin can only copy 'Global' to 'Local'.
|
'Disable' Settings Area ('Global Settings' only) |
Check this box if you wish to disable the use of 'Local Settings' for any non-admin computer users where PrintPower is installed on. The 'Use Local Settings' radio button will become dimmed out ![]() and Users will be forced to use the 'Global Settings' the system administrator sets giving your company more control over its public appearance.
and Users will be forced to use the 'Global Settings' the system administrator sets giving your company more control over its public appearance.
|
'Prompt' Area (Settings Tab) |
Radio Buttons ![]()
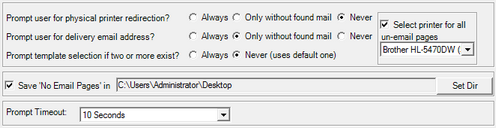
•'Prompt user for physical printer redirection?'
▪'Always': Forces the User to select the printer all documents print to. Unlike the 'Only without...' option, this prints all documents, regardless if they were emailed or not. On the 'Select A Printer...' window the printer defaults to the one used last by PrintPower, and you may click the 'Skip' button to bypass the print job if you wish.
▪'Only without found mail': For documents without a valid email address, the User will be prompted to select the physical printer the un-emailed document(s) will print to. On the 'Select A Printer...' window the printer defaults to the one used last by PrintPower, and you may click the 'Skip' button to bypass the print job if you wish.
▪'Never': You will never be prompted to print any pages. With 'Never' selected, you get an additional option to automatically print all un-emailed document(s) to a default printer without having to be prompted every time.
•'Prompt user for delivery email address?'
▪'Always': All documents with a valid email address will be sent. The User will also be prompted to enter an address manually on the 'Input A Valid Email...' window which will send all documents, including ones with a valid email address, to the entered email address. You may opt out of this by clicking the 'Skip' button on the window.
▪'Only without found mail': All documents with a valid email address will be sent. The User will also be prompted to enter an address manually on the 'Input A Valid Email...' window which will send all documents without a valid address to the manually entered single email address. You may opt out of this by clicking the 'Skip' button on the window.
▪'Never': Whether an email address is found or not, never prompt the User to enter an address manually.
•'Prompt template selection if two or more exist?'
▪'Always': If more than one template exists, always prompt the User to make the selection of which one to use.
▪'Never (uses default one)': If more than one template exists, always use the template which is marked 'Set as default' on the 'Templates' tab.
Check-Box
•'Select printer for all un-emailed pages': With 'Never' selected on the 'Prompt user for physical...' setting, you get an additional check-box option to automatically print all un-emailed document(s) to a default printer without having to be prompted every time.
•'Save 'No Email Pages' in': For documents where valid email addresses were not found, they will be combined into a single PDF document. Select the path to the destination you wish to save this PDF to. If setting up on a Server with restricted access, make sure you select a "common" shared folder which all Users can access.
Drop-Down Menu
'Prompt Timeout': Choose 'Never' or any time between 1 second and 1 minute which a prompt will appear and wait for input from the User. This applies to all prompts.
'Email Sending Settings' Frame - 2 Options (Settings Tab)
|
Option 1
|

'Use SendGrid API' Check-Box (Recommended)
This is the default authentication setting and highly recommended for most users. If checked, this disables the 'SMTP Configuration' section.
|
Option 2 'SMTP Configuration' Area If you have an alternative email server you wish to use, uncheck the 'Use SendGrid API' check-box to enable the 'SMTP Configuration' section and enter your authentication settings manually. |

Fields ('Address' and 'Authentication')
•'Host': Enter the SMTP settings provided by your email hosting service.
•'Port': Enter the port number provided by your email hosting service.
•'Username': Enter the user name (typically the email address) for the account you wish to use to send the emails, as provided by your email hosting service.
•'Password': Enter the password for the account, as provided by your email hosting service.
Check-Boxes
•'Use SSL': Check this box if your email host requires you to use SSL.
•'Use Authentication': Check this box if your email host requires you to use Authentication.
'From/Reply to Email Address' Area
•'From/Reply to Email Address': Enter the email address you wish any replies to come to.
•'Number of Retries...': Set the number of resend attempts an email will make if there is an error.
•'Emails/hour': Set the maximum number of emails to be processed in an hour. 500 is the recommended setting for most users.
'Emails to Filter' Frame
•Details Window: Display any emails you are currently filtering out.
▪'Remove' button: Select an existing email and click the 'Remove' button to drop the email from the filtered list.
•'Add Email' Field: Enter any email addresses you wish to filter out to make sure emails are not sent to them. Enter the address, and click the 'Add' button.
▪'Add' button: Click the 'Add' button to add an entered email to the filtered list.
Bottom Window Frame (Settings Tab)
Buttons
•'Save': Click to save all settings changes and be returned to the 'Status' tab. If you leave the 'Settings' tab before clicking, all changes will be lost.
•'Cancel': Click to cancel any changes and return to the 'Status' tab.
Templates Tab
|
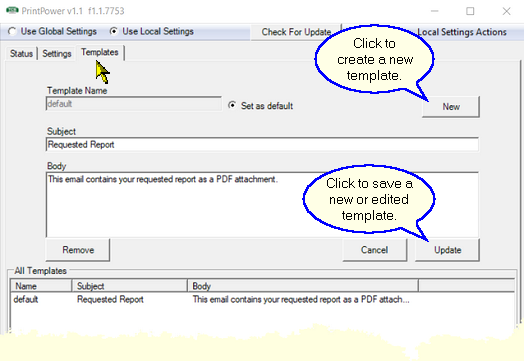
The 'Templates' tab allows you to create and manage your email templates used in the emailing process with PrintPower™. Fields •'Template Name': Displays the name of the selected template. Template names must be unique. •'Subject': Display the selected templates 'Subject' line. •'Body': Displays the email body content of the selected template. |
Radio Button ![]()
'Set as default': First select a template from the 'All Templates' window, then click the 'Set as default' radio button to indicate this is the default template you wish to include with your emails. Only one template may be set as default.
Buttons
•'New': Clears all fields so you may enter information for a new template.
•'Remove': This deletes the template you selected from below in the 'All Templates' window.
•'Cancel': Cancel any changes.
•'Update': This saves a new template or saves modifications to an existing template.
'All Templates' Window
This displays the list of existing templates. Select a template by clicking it, and its content will be displayed above.
See Also:
PrintPower™ Operating with Tire Power
PrintPower™ Document Management